Discover how to create minnie mouse cupcakes, from simple ingredients to perfect decorations, for a fun Disney-themed treat.
Why Minnie Mouse Cupcakes Are a Perfect Party Treat
These minnie mouse cupcakes bring Disney magic to your dessert table. They blend simple flavors with charming designs, making them ideal for themed parties. Moreover, they please both children and adults, ensuring everyone smiles. Consequently, they stand out as a unique treat at birthday celebrations or baby showers.
Altogether, these whimsical desserts transform an ordinary event into something special. Indeed, their playful decorations and recognizable shape add nostalgic flair. Likewise, the bright colors and iconic Minnie ears appeal to Disney fans of all ages. Particularly, these cupcakes suit gatherings where fun and taste collide.
Equally important, minnie mouse cupcakes prove customizable for any preference. You can adjust flavors, frostings, and toppings. Conversely, store-bought cupcakes may lack such personalization. However, homemade versions let you express your creativity. Thus, these cupcakes ensure an enchanting dessert that guests remember long afterward.
Additionally, when paired with other Disney treats, they create a cohesive theme. Undoubtedly, these cupcakes work well alongside Mickey-shaped cookies or cartoon-inspired candies. Consequently, your dessert table transforms into a culinary wonderland. In short, they add joy, color, and flavor to your next party.
Choosing the Right Ingredients for Perfect Minnie-Themed Cupcakes
The quality of your ingredients directly affects flavor, texture, and appearance. Initially, select a light, fluffy cake batter, such as vanilla or chocolate. Comparatively, these simple bases allow Minnie’s signature colors and details to shine. Equally, choose fresh butter, rich cocoa, and pure vanilla extract to ensure a moist crumb.
Furthermore, consider using organic flour and farm-fresh eggs. While more expensive, these choices impart a richer taste. Indeed, better ingredients create cupcakes that melt in your mouth. Accordingly, avoid processed mixes that may taste artificial. Another tip involves using finely milled sugar for a smoother batter.
Eventually, add a dash of salt to balance the sweetness. Although minimal, this step sharpens flavors and keeps your cupcakes from tasting flat. Specifically, salt complements the vanilla and chocolate notes. Meanwhile, proper ingredient ratios prevent dryness or sinking in the oven.
Additionally, experiment with subtle flavor boosts. For example, add a hint of almond extract or lemon zest. Consequently, these small tweaks create memorable cupcakes. Finally, ensure all ingredients reach room temperature before mixing. Thus, your batter whips together smoothly, guaranteeing fluffy results.
Understanding Flavor Profiles
When crafting Minnie-inspired cupcakes, think about pairing flavors that delight. Generally, chocolate and vanilla remain classic favorites. However, consider strawberry for a pop of color. Comparatively, a strawberry cupcake with vanilla buttercream evokes Minnie’s iconic pink bow.
Moreover, subtle hints of citrus brighten the palate. Conversely, rich caramel or salted chocolate frosting adds complexity. Consequently, experimentation leads to new taste combinations that surprise guests. Indeed, try pairing unexpected flavors, like raspberry jam filling in a chocolate cupcake.
Altogether, choose a flavor profile that complements the theme. Afterward, test small batches to refine the final recipe. In particular, keep ingredients balanced so sweetness never overwhelms. Thus, perfecting these profiles ensures a dessert that everyone savors.
Sourcing Quality Ingredients
High-quality ingredients improve both taste and presentation. Initially, find a reliable local bakery supply store. Comparatively, specialty markets often offer premium extracts and organic flours. Additionally, online sources provide unique sprinkles or colored sugars that suit Minnie’s palette.
Furthermore, invest in top-tier cocoa powder for chocolate bases. Likewise, choose unsalted butter over margarine for superior texture. Meanwhile, organic vanilla extract offers a purer taste profile. Another smart move involves buying in bulk if you bake frequently. Consequently, this reduces cost and ensures freshness.
Finally, store ingredients properly. For example, keep butter refrigerated and flour in airtight containers. Undoubtedly, fresh, well-preserved ingredients yield fluffier, tastier minnie mouse cupcakes. Therefore, treat your pantry as a treasure chest of culinary potential.
How to Bake Minnie Mouse Cupcakes from Scratch
Baking these minnie mouse cupcakes involves patience, precision, and a creative touch. Initially, preheat your oven to ensure even baking. Consequently, measure ingredients accurately and follow the recipe closely. Moreover, sift dry ingredients to incorporate air and remove lumps.
Eventually, combine wet and dry components just until blended. Overmixing can produce dense cupcakes. Accordingly, use a light hand and smooth motions. Subsequently, fill cupcake liners two-thirds full. Undoubtedly, proper portioning ensures even baking and prevents overflow.
Afterward, bake until a toothpick emerges clean. Eventually, remove the cupcakes and let them cool. Indeed, cooling is vital before decorating. Therefore, never rush the process. Once cooled, apply frosting, decorations, and Minnie ears.
Essential Tools for Minnie Mouse Cupcakes
Crafting minnie mouse cupcakes requires specialized tools. Initially, invest in quality cupcake pans with nonstick coatings. Additionally, choose sturdy cupcake liners that maintain shape. Indeed, stable liners help achieve a professional finish.
Furthermore, a reliable stand mixer simplifies blending. Equally, offset spatulas ensure smooth frosting application. Meanwhile, piping bags and tips let you create bows, polka dots, and intricate designs. Another useful tool is a small cookie cutter for shaping Minnie ears from fondant or chocolate.
Altogether, these tools streamline the process, reducing stress and errors. Subsequently, you can focus on creativity rather than struggling with dull knives or flimsy pans. Therefore, a well-equipped kitchen leads to better results.
Step-by-Step Instructions
- Preheat your oven: Set it to 350°F for consistent results.
- Prepare dry ingredients: Sift flour, baking powder, and cocoa or vanilla powder.
- Cream butter and sugar: Beat until fluffy, then add eggs and vanilla extract.
- Combine mixtures: Add dry ingredients gradually, alternating with milk.
- Fill liners: Spoon batter into cupcake liners, about two-thirds full.
- Bake: Cook for about 18-20 minutes. Check with a toothpick.
- Cool completely: Place cupcakes on a wire rack until fully cool.
- Decorate: Apply frosting, fondant ears, and a signature Minnie bow.
Eventually, adapt the steps to suit your chosen flavors. Meanwhile, keep an eye on baking times, as they may vary by oven. Consequently, practice ensures consistent, perfect cupcakes every time.
Common Mistakes When Making Minnie Mouse Cupcakes
Many bakers struggle with minnie mouse cupcakes because of a few common errors. Basically, overmixing leads to dense texture. Similarly, under-baking results in raw centers. Consequently, follow guidelines and test doneness frequently.
Another mistake involves using low-quality frosting. Indeed, watery icing may slide off. Thus, choose stable buttercreams or cream cheese frostings. Likewise, improper fondant handling results in cracked ears. Therefore, roll fondant smoothly and use cornstarch to prevent sticking.
Equally, avoid overloading cupcakes with sprinkles or decorations. Comparatively, too much weight may collapse the cake’s delicate structure. Furthermore, always ensure cupcakes cool fully before decorating. Undoubtedly, warm cupcakes melt frosting, causing a messy finish.
Finally, do not rush. Eventually, with patience and practice, you will master these cupcakes. Consequently, each batch will turn out more delightful than the last.
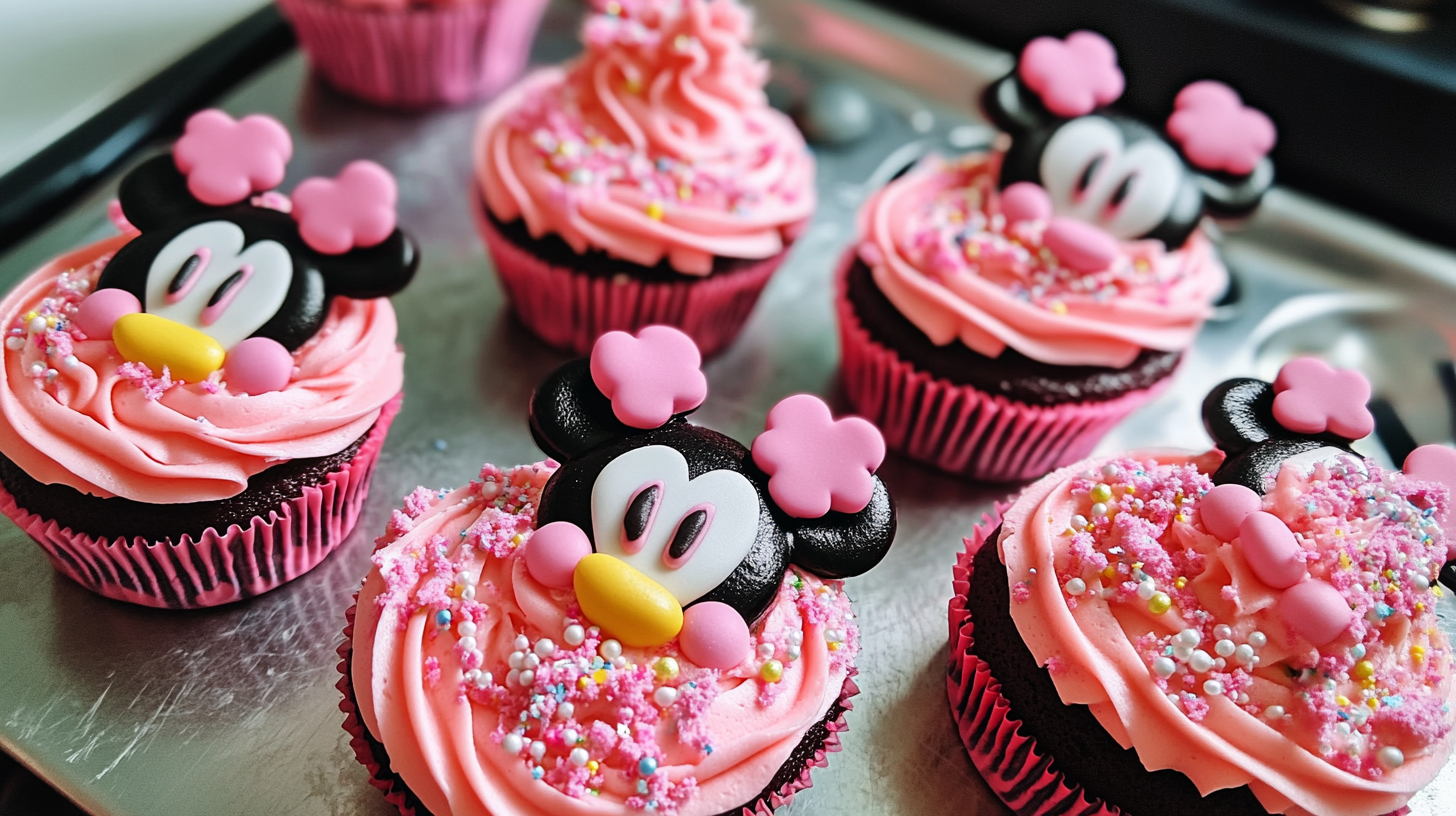
Decorating Techniques for Adorable Minnie Designs
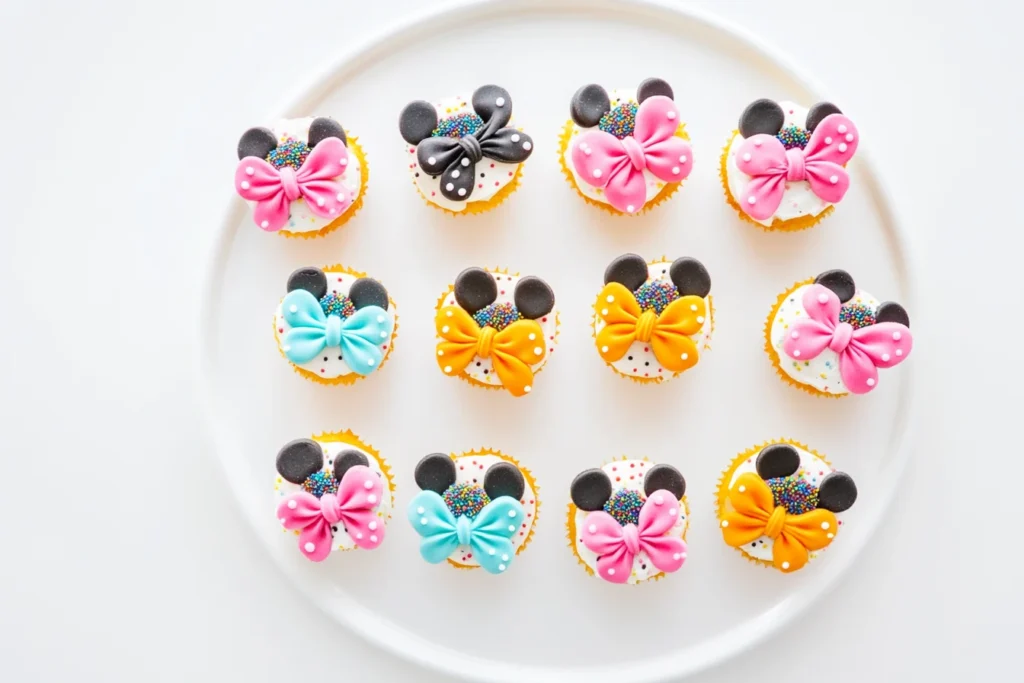
Decorations transform simple cupcakes into adorable Minnie-inspired treats. Initially, consider color schemes. Typically, Minnie’s signature colors include red, pink, and white. Likewise, polka dots and bows capture her playful personality.
Furthermore, pipe frosting in swirls, then add fondant Minnie ears on top. Another idea involves creating a small fondant bow. Consequently, your cupcakes look like Minnie’s iconic headband. Particularly, consider adding sugar pearls or edible glitter for extra sparkle.
Additionally, use stencils to dust powdered sugar designs. Conversely, hand-painting edible dyes may create custom patterns. Basically, have fun experimenting. Eventually, you will discover new techniques that impress your guests.
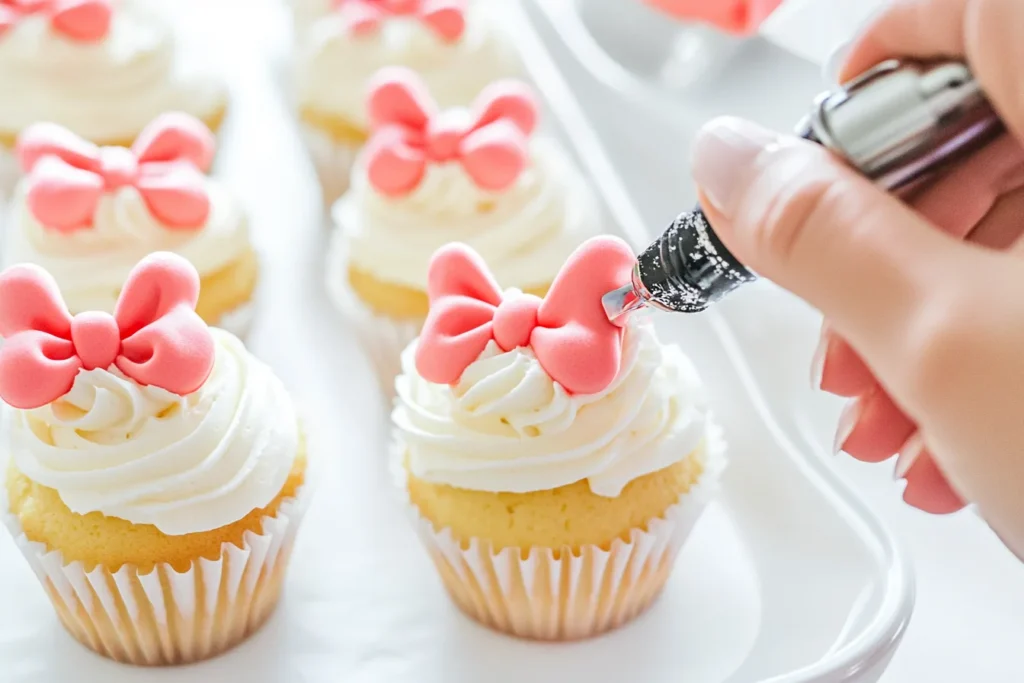
Shaping Minnie Ears and Bows
Crafting Minnie ears requires pliable fondant or modeling chocolate. Initially, roll fondant thinly and use a small circular cutter. Basically, you need two equal circles per cupcake. Afterward, let them dry slightly, so they stand upright.
For the bow, shape a small rectangle and pinch the center. Consequently, it forms a classic bow shape. Another method involves using a bow-shaped silicone mold. Particularly, molds ensure uniform bows with minimal effort.
Finally, attach ears and bows with a dab of frosting. Indeed, the frosting acts like glue. Undoubtedly, these details bring authenticity to your cupcakes, evoking Minnie’s timeless charm.
Adding Colorful Frosting and Sprinkles
Colorful frosting elevates visual appeal. Initially, use gel food coloring for vibrant hues. Meanwhile, be cautious not to add too much. Furthermore, apply frosting with a piping bag for clean lines and consistent swirls.
Additionally, sprinkle polka dots using mini chocolate chips or candy pearls. Another approach involves placing sugar bows strategically. Eventually, balance colors so they match Minnie’s theme. Consequently, pink, red, white, and black details look best together.
Equally, try mixing different textures. Comparatively, crunchy sprinkles contrast with fluffy cake. Therefore, each bite delights the senses. Altogether, these decorating techniques ensure that your minnie mouse cupcakes taste as good as they look.
Storing and Serving Tips
Proper storage preserves freshness and flavor. Initially, let cupcakes cool completely before storage. Consequently, store them in airtight containers. Indeed, this prevents dryness and helps maintain moist interiors.
Furthermore, keep them away from direct sunlight or heat. Particularly, buttercream frosting may melt if exposed to warmth. Additionally, refrigerate cupcakes if you plan to store them for more than two days. Conversely, serve them at room temperature for the best taste and texture.
Likewise, consider how you present them. Indeed, arrange cupcakes on a decorative platter. Additionally, add themed decorations around them. Consequently, the display enhances your party’s overall aesthetic. Undoubtedly, thoughtful presentation makes guests eager to try them.
Storing and Freezing Your Minnie Mouse Cupcakes
To freeze minnie mouse cupcakes, first wrap them individually in plastic wrap. Basically, this seals in moisture. Afterward, place them in a freezer-safe container. Eventually, they last several weeks when frozen properly.
Consequently, thaw them overnight in the refrigerator. Another approach: let them sit at room temperature for an hour. However, never refreeze thawed cupcakes, as it affects taste and texture. Meanwhile, add decorations after thawing to keep designs fresh.
Finally, consider labeling containers with baking dates. Indeed, this helps track freshness. Undoubtedly, proper storage ensures your cupcakes remain party-ready at any time.
Presenting Your Cupcakes to Guests
Serving these cupcakes creatively enhances your event. Basically, place them atop a tiered stand for a centerpiece effect. Another idea involves arranging them in a circle, forming Minnie’s head shape. Subsequently, fill the center with a matching cake or cookies.
Eventually, add small decorative cards or Disney-inspired confetti around the display. Specifically, incorporate Minnie Mouse napkins or plates. Thus, guests feel immersed in the theme. Undoubtedly, these finishing touches leave a lasting impression.
Where to Find Minnie Mouse Cupcakes and Decorations
If you prefer not to bake, you can buy minnie mouse cupcakes from local bakeries. Basically, many bakeries specialize in character-themed treats. Alternatively, grocery stores sometimes carry them for seasonal promotions. Likewise, online cupcake shops deliver nationwide.
Furthermore, find Minnie-inspired decorations online. Particularly, check baking supply websites for themed wrappers and sprinkles. Additionally, party stores carry Minnie birthday kits, including cupcake toppers and stands. Consequently, you can easily assemble these treats at home.
Eventually, you may discover unique decorations at craft stores. Indeed, fondant molds, edible glitter, and stencil sets await. Moreover, local markets sometimes host artisan bakers who sell homemade Disney-themed cupcakes. Undoubtedly, you have multiple options.
Locally Sourced Minnie Mouse Cupcakes at Bakeries
Bakeries often collaborate with local designers to create intricate cupcakes. Initially, call ahead and place custom orders. Consequently, you can request specific colors, flavors, or toppers.
Furthermore, tasting samples before buying in bulk helps ensure satisfaction. Additionally, bakers may offer delivery or catering services. Thus, you can simplify party planning. Ultimately, professional bakers reduce stress and guarantee stunning cupcakes.
Indeed, local bakers appreciate your business, and you get fresh, handcrafted treats. Eventually, this relationship benefits both parties. Undoubtedly, choosing local sources supports your community while delighting your guests.
Frequently Asked Questions (FAQs)
What is Minnie Mouse’s old name?
Minnie Mouse first appeared as Minerva Mouse. However, this was more a formal name than a widely used title. Eventually, the character became known simply as Minnie Mouse. Undoubtedly, Minnie’s timeless charm endures, capturing hearts since her debut in 1928.
How old is the oldest cupcake?
Cupcakes trace their roots back to the late 18th century. Particularly, the earliest written recipes emerged around the 1790s. While there’s no single “oldest cupcake,” this dessert style has existed for centuries. Indeed, today’s varieties reflect evolving tastes and baking techniques.
How long should mini cupcakes bake at 350 degrees?
Mini cupcakes generally bake faster than standard ones. Typically, they need about 10-12 minutes at 350°F. However, oven temperatures vary. Consequently, test with a toothpick after 10 minutes. Eventually, adjust time as needed to achieve a moist, fully cooked center.
How long before cupcakes go bad?
Cupcakes remain fresh for about 2-3 days at room temperature. However, if refrigerated, they may last up to a week. Conversely, freezing extends their life to several weeks. Eventually, always rely on smell, taste, and appearance before serving older cupcakes.
READ MORE: